Using CCW Estimate API
If you have have finished reading the previous post I’m must congratulate you. I know that it was really boring and yes it must have been difficult to understand sometime but you have made it so now let’s do that fun part - programming it and testing it. For the purpose of this series I will be using Python but I know about engineers I’m currently talking they are using Go for this. I’m hoping these posts will help other engineers and we will see using this for other languages!
Acquire Estimate with CCW Estimate APIs
As I have explained in the previous post we will have multiple requests which we can use for CCW Estimate API.
Available requets are:
- List Estimate request -
https://api.cisco.com/commerce/EST/v2/async/listEstimate - Update Estimate request -
https://api.cisco.com/commerce/EST/v2/async/updateEstimate - Create Estimate request -
https://api.cisco.com/commerce/EST/v2/async/createEstimate - Acquire Estimate request -
https://api.cisco.com/commerce/EST/v2/async/acquireEstimate
I have decided to start with Acquire Estimate in this post and will focus on next requests in the future posts. I will explain in the following paragraph why I have decided to start with Acquire Estimate Request.
CCW Estimate API ‘blog project’ workflow
I wanted to create the workflow which will allow me to show you as many features as possible. I will start with acquireEstimate which will read the Estimate. The script will export the whole estimate into the text file and with all the details we will need for using any items from exported estimate for any new estimate.
Exported text file will contain all the items we will want to add into the new estimate. In our case it will be default built of Catalyst 9300 48 ports, Nexus 9300 and HyperFlex including all necessary licenses. Afterwards we will split these items into separate files so we can use them in the future as the reference points for adding these items to new estimates.
Let’s assume we have segregated file for Catalyst 9300, Nexus 9300 and HyperFlex. We will now have createEstimate script which will import these text files into the single XML request and added into CCW Estimate Create request and create new CCW estimate with the valid configuration.
Let’s start with Postman
General rule when you are automating stuff is to start with small steps and in my experience that always starts with testing the APIs and what they can offer. I have done the same thing with CCW Estimate API and I would recommend to do the same thing.
You can find how to set up Postman and where to download Postman files in the previous post.
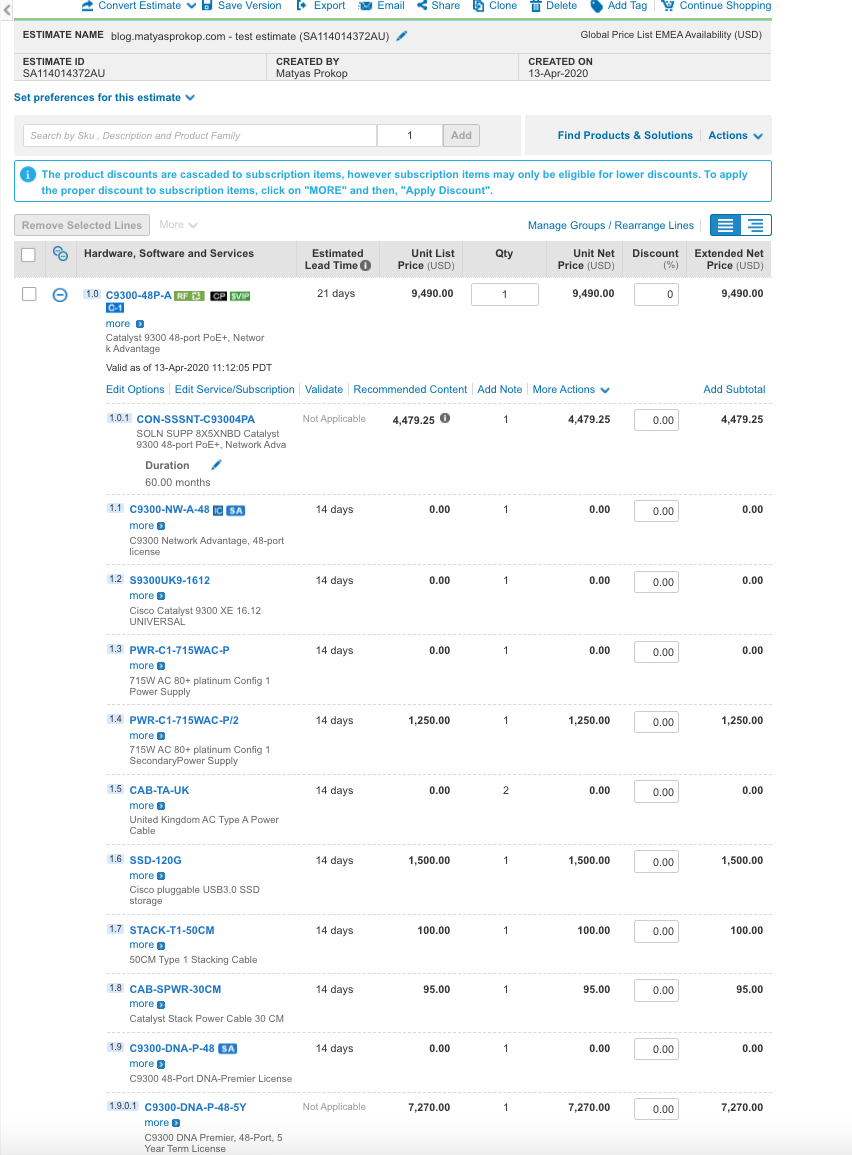
Creating estimate
For purposes of this post let’s create new standard CCW estimate. I have created estimate with single C9300-48P-A. It will look like this:
CCW Estimate API Acquire Estimate - Authentication
I will start my script with importing all necessary variables: client_id client_secret username password from pass.txt in the root folder. Each item defined in the new line.
pass_file = open("./pass.txt","r") #opens file with name of "pass.txt"
fileList = pass_file.read().splitlines()
client_id = fileList[0]
client_secret = fileList[1]
username= fileList[2]
password = fileList[3]
We will need these variables to authenticate so now let’s add OAuth2 part which I have xplained in the previous post:
oauth = OAuth2Session(client=LegacyApplicationClient(client_id=client_id))
token = oauth.fetch_token(token_url='https://cloudsso.cisco.com/as/token.oauth2',
        username=username, password=password, client_id=client_id,
        client_secret=client_secret)
As you can see this is nothing new and it is using variables which we have already defined in the text file pass.txt.
CCW Estimate API Acquire Estimate - Head and Body
Now the funny part - head and body. I don’t want to tell you how much time I have spent on this as the CCW documentation didn’t really explain any of these details. Everything I will show you in this paragraph is the minimum amount of attributes and variable you will need in Head and Body of your request. If you will change any of these variables it will most likely fail with the series of totally unhelpful messages for instance ‘Invalid Solution Version ID’. Go figure what you have done wrong….
Anyway let’s start with the header. In the header we will use our token which have generated in the previous part of our script:
headers = {"Content-Type": "text/xml", "Authorization": "Bearer "+str(token['access_token'])}
We have the header now so let’s focus on the body of our Acquire Estimate request. We will use standard soapenv tags so the final template for Acquire Estimate will look like this:
<soapenv:Envelope xmlns:soapenv="http://schemas.xmlsoap.org/soap/envelope/" xmlns:hs="https://api.cisco.com/commerce/EST/v2/async/acquireEstimate">
 <soapenv:Body>
  <ProcessQuote releaseID="2014" versionID="1.0" systemEnvironmentCode="Production" languageCode="en-US" xmlns="http://www.openapplications.org/oagis/10">
   <ApplicationArea>
    <Sender>
     <ComponentID schemeAgencyID="Cisco">B2B-3.0</ComponentID>
    </Sender>
    <Extension>
     <Code typeCode="Estimate">Estimate</Code>
    </Extension>
   </ApplicationArea>
   <DataArea>
    <Quote>
     <QuoteHeader>
      <ID typeCode="Estimate ID">$estimate_id</ID>
      <Extension>
      </Extension>
     </QuoteHeader>
    </Quote>
   </DataArea>
  </ProcessQuote>
 </soapenv:Body>
</soapenv:Envelope>
There are two important parts which you should be aware and that is ComponentID and QuoteHeader. ComponentID has to have variable schemeAgencyID="Cisco" defined as B2B-3.0. There is now way you will use any other scheme for your request. Any deviation from this will cause the error. Second important thing is QuoteHeader where as you can see we have a bit <ID typeCode="Estimate ID">$estimate_id</ID>. Here we will use our estimate ID (for instance PF92406645GK) which we will want to export.
When this is all done we can submit our request to CCW Estimate API:
out = requests.post("https://api.cisco.com/commerce/EST/v2/async/acquireEstimate", data=body, headers=headers)
CCW Estimate API Acquire Estimate - Response
If everything went well we should have the response stored in out variable. This is cool but working with response in XML format will not be much helpful. I have decided to pull the data from XML file with BeautifulSoup libraries as variables and use these variable when we will be creating the text file.
BeautifulSoup is an amazing Python library which essentially convert XML into the table with columns and rows and each row can contain multiple variables (columns).
First things first so let’s import xml response and use txt as the output and convert this into the table.
soup = BeautifulSoup(out.text, 'xml')
table = soup.Quote
Now when we have a table with x rows which is equal of x amount of items we will want to go through them item by item. We will achieve this by searching for all QuoteLine attributes in all items which will give us total number of times. Every item we have exported from the estimate has its unique QuoteLine.
table_rows = table.find_all ('QuoteLine')
We have total number of lines in our table therefore we can loop through every single item and get all the attributes we will need. However you may ask which attributes you would need to export (there are dozens of attributes for each item) and after long testing and reverse engineering I can tell you which attributes exactly are required:
| Attribute | Description |
|---|---|
| CCWLineNumber | Item’s line number you see in CCW |
| PartNumber | Item’s part number |
| LineNumberID | Unique line number for each item within specific CCW estimate |
| Quantity | Quantity of items |
| ConfigurationPath | Cisco CCW internal attribute |
| ConfigurationSelectCode | Cisco CCW internal attribute |
| ItemType | Cisco CCW internal attribute |
| ParentID | Parent ID - linking sub-items with parent items |
| Duration | Important for licensing |
Now when we know which attributes are required we will extract them from XML:
NameValue = tr.find_all('NameValue', {"name": "CCWLineNumber"})
id = tr.find_all('ID', {"typeCode": "PartNumber"})
lineId = tr.find_all('LineNumberID')
qt = tr.find_all('Quantity', {"unitCode": "each"})
configPath = tr.find_all('ValueText', {"typeCode": "ConfigurationPath"})
configSelectCode = tr.find_all('ValueText', {"typeCode": "ConfigurationSelectCode"})
itemType = tr.find_all('ValueText', {"typeCode": "ItemType"})
parentID = tr.find_all('ParentID')
duration = tr.find_all('Duration')
This can be tricky as some of the items has attribute duration but some of them don’t. For these reasons we have to make sure that if the attribute is not defined for particular item we will make it zero:
if not duration:
    durationLn = "0"
else:
    durationLn = [i.text for i in duration]
if not configPath:
    configPathLn = "0"
else:
    configPathLn = [i.text for i in configPath]
if not configSelectCode:
    configSelectCodeLn = "0"
else:
    configSelectCodeLn = [i.text for i in configSelectCode]
if not itemType:
    itemTypeLn = "0"
else:
    itemTypeLn = [i.text for i in itemType]
For purposes of this blog post we will now print out items line by line:
print (idLn[0] + "," + lineIdLn[0] + "," + NameValueLn[0] + "," + configPathLn[0] + "," + parentIDLn[0] + ","+ qtLn[0] + "," + durationLn[0] + "," + itemTypeLn[0]+ "," + configSelectCodeLn[0])
The output of our script will look something like this:
1.0,77003256742,C9300-48P-A,C9300-MODEL:PRODUCTNAME|C9300-48P-A,0,1,P0Y0M21DT0H0M,CONFIGURABLE,USER
1.1,77003257432,C9300-NW-A-48,C9300-MODEL:NETWORK_LICENSE|C9300-NW-A-48,77003256742,1,P0Y0M14DT0H0M,NONCONFIGURABLE,SYSTEM
1.2,77003257433,S9300UK9-1612,C9300-MODEL:SOFTWARE|S9300UK9-1612,77003256742,1,P0Y0M14DT0H0M,NONCONFIGURABLE,USER
1.3,77003257434,PWR-C1-715WAC-P,C9300-MODEL:PRIMARY_POWER_SUPPLY|PWR-C1-715WAC-P,77003256742,1,P0Y0M14DT0H0M,NONCONFIGURABLE,USER
1.4,77003257435,PWR-C1-715WAC-P/2,C9300-MODEL:SECOND_POWER_SUPPLY|PWR-C1-715WAC-P/2,77003256742,1,P0Y0M14DT0H0M,NONCONFIGURABLE,USER
1.5,77003257436,CAB-TA-UK,C9300-MODEL:POWER_CABLES|CAB-TA-UK,77003256742,2,P0Y0M14DT0H0M,NONCONFIGURABLE,USER
1.6,77003257437,SSD-120G,C9300-MODEL:SSD_MODULE|SSD-120G,77003256742,1,P0Y0M14DT0H0M,NONCONFIGURABLE,USER
1.7,77003257438,STACK-T1-50CM,C9300-MODEL:STACKWISE_CABLES|STACK-T1-50CM,77003256742,1,P0Y0M14DT0H0M,NONCONFIGURABLE,USER
1.8,77003257439,CAB-SPWR-30CM,C9300-MODEL:STACK_POWER_CABLES|CAB-SPWR-30CM,77003256742,1,P0Y0M14DT0H0M,NONCONFIGURABLE,USER
1.9,77003257440,C9300-DNA-P-48,C9300-MODEL:SUBSCRIPTION_SW_CLAS:2:CISCO_ONE_AND_DNA|C9300-DNA-P-48,77003256742,1,P0Y0M14DT0H0M,CONFIGURABLE,USER
1.9.0.1,77003257441,C9300-DNA-P-48-5Y,0,77003257440,1,P0Y60M0DT0H0M,SUBSCRIPTION,0
1.10,77003257442,ISE-BASE-T,C9300-MODEL:SUBSCRIPTION_SW_CLAS:2:CISCO_ONE_EXPANSIONS|ISE-BASE-T,77003256742,25,P0Y0M3DT0H0M,NONCONFIGURABLE,SYSTEM
1.10.0.1,77003257443,ISE-BASE-TRK-5Y,0,77003257442,25,P0Y60M0DT0H0M,SUBSCRIPTION,0
Summary
In this post were exploring how to use read the CCW Estimate, read the items from estimate and build Python script with Python libraries BeautifulSoup on top of it. You should be now able to build your own script also in other languages than Python. We can now export items from the CCW estimate which we will be use for our next step - creating new estimates but I will explain this in the another post.